Early beta / work in progress: the project is already working and usable, with more information coming over the next weeks and months.
An animated retro-arcade clock on a 128x64 RGB LED matrix, driven by an ESP32-S3.

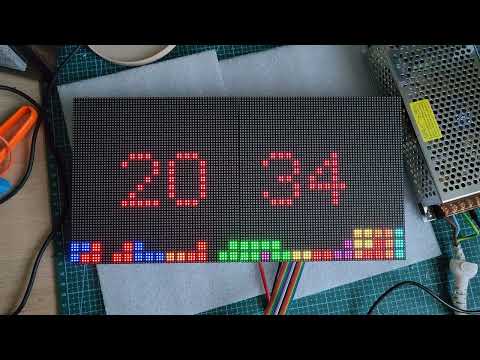

Fourteen clock styles (Mario, Space Invaders, Pac-Man, Snake, Tetris, Asteroids, Dino Runner, Matrix Rain, Missile Command and more), fully configurable from a built-in web interface: per-element sprite colors, brightness with scheduled night dimming, automatic timezone/DST, OTA updates. It can also act as a PC performance monitor, showing live CPU/GPU/RAM/network stats sent by a desktop companion app.
Looking for the small OLED version? See the sibling project SmallOLED-PCMonitor.
| Part | Notes |
|---|---|
| ESP32-S3 board | Developed on an ESP32-S3-WROOM-1 (N16R8) devkit; Waveshare ESP32-S3-Zero also supported |
| 2x Waveshare P2.5 64x64 HUB75E panels | Chained into one 128x64 canvas, 1/32 scan, FM6126A driver (init handled by the firmware) |
| 5V PSU, ~10A | Power each panel directly, common ground with the ESP32 |
The panels run fine from the ESP32's 3.3V logic directly, no level shifters needed. Full bench wiring, power-up order and first-light checklist: docs/HUB75_WIRING.md (with pinout diagram).

R1=1   G1=2   B1=4     R2=5   G2=6   B2=7
A=8    B=9    C=10     D=11   E=12
CLK=13 LAT=14 OE=38
The E line is required for 64x64 (1/32 scan) panels.
| ID | Style | Description |
|---|---|---|
| 0 | Mario | Mario jumps to bounce changed digits; optional idle enemy encounters |
| 1 | Standard | Traditional digital clock with date |
| 2 | Large | Extra-large digits |
| 3 | Space Invaders | Invader ship shoots lasers to change digits |
| 4 | Space Ship | Reserved variant of style 3 |
| 5 | Pong / Arkanoid | Breakout-style ball physics, digits shatter and reassemble |
| 6 | Pac-Man | Pac-Man eats pellet-based digits |
| 7 | Snake | Nokia-style snake hunts pellets left by changed digits |
| 8 | Tetris | Block digits rebuilt by slabs or falling dots, idle tetrominoes in classic piece colors |
| 9 | Cycle All Styles | Rotates through every style every 5 minutes |
| 10 | Asteroids | Wireframe ship shoots changed digits into spinning line shards |
| 11 | Dino Runner | Chrome T-Rex runs and jumps cacti; a pterodactyl swaps changed digits |
| 12 | Matrix Rain | Digital rain with fading glyph trails; changed digits decode out of the rain |
| 13 | Missile Command | Dotted missile trails rain on city silhouettes; explosion rings wipe changed digits |
| 14 | Weather Clock | Time plus live local weather: animated condition icon, temperature, daily range, humidity, sunrise/sunset |
Every style's sprite colors are individually editable in the web interface (digits, characters, effects, backgrounds), so each clock can match your setup.
Once on WiFi, open the device's IP address or http://pixelclock.local in a browser:
- Clock settings: style, 12/24 hour, date format, position, per-style animation options, per-element colors with one-click reset to defaults
- Display: brightness (live slider), colon blink mode/rate, adaptive refresh rate, scheduled night dimming (start/end time to the minute + dim level) and a scheduled power-off window that blanks the panel overnight to spare the LEDs
- Timezone: ~76 regions with automatic DST transitions (POSIX TZ database, no manual toggles)
- Network: DHCP or static IP, device name (mDNS), show IP at boot
- PC monitor layout: which metrics are visible and where, 5-row / 6-row / large text modes, progress bars, drag-and-drop placement on a live preview
- Config export/import as JSON (includes the color palette)
- Firmware update: upload a
.binover the air
The Weather Clock (style 14) shows current conditions next to the time: an animated icon (sun, clouds, rain, snow, storm...), the temperature, today's high/low, humidity and sunrise/sunset times. When enabled it also joins the Cycle All rotation as an extra screen.
Setup (web interface, Clock page, Weather Clock style):
- Tick Enable weather updates.
- Type your city into Find your location and press Search - it fills in the coordinates (the lookup runs in your browser; the device only stores latitude and longitude). You can also enter coordinates manually.
- Pick Celsius or Fahrenheit. Save.
Data comes from Open-Meteo (no account or API key needed), fetched every 10 minutes. The optional API key field is only for Open-Meteo commercial subscriptions. Icon, effect and temperature colors are editable in the style's Colors card like any other clock.
On the web interface's Display page you can run an ambient screensaver instead of
the clock: a Space Invaders battle, a Pac-Man chase, a starfield, an aquarium with
fish, bubbles and kelp, or a burning room where a very calm dog insists everything is
fine. An optional small clock stays in the corner. Press Start
now to keep the effect on until you stop it, or enable the schedule to have it come
on automatically during set hours (e.g. 20:00-23:00). GET /api/mode/ambient /
/api/mode/auto do the same from automations.
The Custom animation ambient effect plays animations you upload to the device (16MB boards only - the 4MB variant's filesystem is too small, so the option hides itself there). Convert any animated GIF on your PC with the bundled tool:
pip install pillow
python tools/gif2pca.py my.gif                        # writes my.pca
python tools/gif2pca.py my.gif --preview check.gif    # eyeball the result first
python tools/gif2pca.py my.gif --upload http://pixelclock.local   # convert + upload
The converter fits the GIF to the 128x64 panel (--fit crop|pad|stretch, with
--anchor start|center|end choosing which edge survives a crop - use --anchor end
to keep a caption at the bottom), quantizes all frames to one 16-color palette and
packs them into a compact .pca file (about 4KB per frame, 1.5MB max, up to 360
frames; use --frame-skip 2 for long GIFs).
Upload either with --upload, with the file picker on the Display page (select the
ambient effect "Custom animation" to see it), or with curl:
curl -F "anim=@my.pca" "http://pixelclock.local/api/anim/upload"Then pick the animation in the dropdown, Save, and Start now. Uploaded
animations survive reboots and firmware updates; manage them with
GET /api/anim/list and GET /api/anim/delete?name=<name>.
With the companion app running on your PC, the display switches to live hardware stats (CPU/GPU temps and loads, RAM, disks, fans, network throughput; up to 20 metrics) and returns to the clock when the PC goes offline.
Companion app v4 (Windows + Linux) lives in
PC-Companion-App-v4-beta/: a tray app with a
web-style config window, live device preview, drag-and-drop layout editor and
sensor picker.
- Windows: run the prebuilt
win-companion/dist/pc_stats_monitor_v4.exe, no Python needed. Install LibreHardwareMonitor and run it as Administrator for temperature/fan/power sensors (on 0.9.5+ enable Options > Remote Web Server > Run). - Linux:
cd PC-Companion-App-v4-beta/linux-companion, thenpython3 -m pip install -r requirements.txtandpython3 pc_stats_monitor_v4_linux.py.
Data is sent over local UDP (port 4210) as JSON, a few times per second at <1% CPU.
With the companion app streaming your PC's sound, the display becomes a 32-band spectrum analyzer: smooth bars with a green/yellow/red gradient (colors editable), falling peak dots, and an optional small clock in the corner.
Setup:
- On the PC:
pip install soundcard numpy, then tick Audio visualizer stream on the companion's Connection page and save. It captures whatever the PC is playing (WASAPI loopback on Windows, PulseAudio monitor on Linux) - no cables, no microphone. - On the device: Display page -> Audio visualizer card -> Start visualizer
(or
GET /api/mode/vizfrom an automation).
The visualizer stays on until you stop it; if the audio stream disappears for 10 seconds the display falls back to the clock and returns automatically when the stream resumes.
Built with PlatformIO.
# ESP32-S3-WROOM devkit (default)
pio run -e matrix-s3-wroom -t upload

# Waveshare ESP32-S3-Zero
pio run -e matrix-s3
The S3-Zero has no USB-UART chip: for the first flash hold BOOT while plugging in
USB, then use OTA. The matrix-s3-bringup / matrix-wroom-bringup environments
build a standalone panel self-test (bringup/hello_matrix.cpp) with six test
patterns, useful for verifying wiring before flashing the full firmware.
On first boot the device opens an access point named PixelClock-Setup. Join it
and a captive portal (or 192.168.4.1) lets you enter your WiFi credentials.
Improv-Serial provisioning over USB is also supported.
After the initial flash, update over WiFi from the web interface's Firmware Update section, or from the command line:
curl -F "firmware=@.pio/build/matrix-s3-wroom/firmware.bin" http://<device-ip>/updateSimple GET endpoints for home automation (Home Assistant, Node-RED, cron + curl). All controls are runtime-only: they reset to the configured behavior after a reboot, which avoids flash wear from frequent automation toggles. No authentication, so keep the device on a trusted LAN.
| Endpoint | Description |
|---|---|
/api/status |
Current display/mode state as JSON |
/api/display/off / /api/display/on |
Blank / restore the panel |
/api/display/brightness?value=0-100 |
Set brightness (percent) |
/api/mode/clock / /api/mode/auto |
Force the clock / resume automatic mode |
/api/mode/ambient |
Force the ambient screensaver on now |
/api/mode/viz |
Force the audio spectrum visualizer (needs the companion streaming) |
/api/clock/style?id=0-14 |
Switch the clock style (IDs in the table above) |
/api/reboot |
Soft-restart (settings kept) |
curl http://pixelclock.local/api/display/off
curl "http://pixelclock.local/api/display/brightness?value=30"
curl "http://pixelclock.local/api/clock/style?id=8"
Home Assistant example:
rest_command:
  clock_display_off:
    url: "http://pixelclock.local/api/display/off"
  clock_display_on:
url: "http://pixelclock.local/api/display/on"Push a message banner onto the display from anything that can send an HTTP request. The banner appears over whatever is on screen (clock or PC stats), scrolls if the text is too long, and disappears on its own.
curl -X POST http://pixelclock.local/api/notify \
  -H "Content-Type: application/json" \
-d '{"text":"Doorbell!","icon":"bell","color":"#FFAA00","duration":8000}'| Field | Required | Description |
|---|---|---|
text |
yes | Message, up to 200 characters |
color |
no | Banner color as #RRGGBB (default white) |
icon |
no | One of bell, mail, alert, heart, check, cross, info, home, music, star |
duration |
no | Display time in ms, 1000-60000 (default 5000) |
position |
no | top or bottom (default: the position set in the web interface) |
GET /api/notify/dismiss clears the banner early. A new POST replaces the current
banner. The feature can be disabled entirely on the web interface's Display page
(Notifications card), where the default banner position is also set.
Home Assistant example:
rest_command:
  clock_notify:
    url: "http://pixelclock.local/api/notify"
    method: POST
    content_type: "application/json"
payload: '{"text":"{{ message }}","icon":"{{ icon | default(''info'') }}","color":"{{ color | default(''#FFFFFF'') }}"}'- ESP32-HUB75-MatrixPanel-DMA (matrix driver)
- Adafruit GFX, WiFiManager (tzapu), ArduinoJson, Improv-Serial
Open source. Feel free to modify and share.